| You can | create a | simple table | like this. |
|---|---|---|---|
| an image | <p> </p> </p> |
extends the table | vertically. |
| A pipe | extends the table | laterally. |
Latest Articles
Showing latest 8 of 8 articles
Showing latest 8 of 8 articles
| You can | create a | simple table | like this. |
|---|---|---|---|
| an image | <p></p> |
extends the table | vertically. |
| A pipe | extends the table | laterally. |
Navigate to /exocore/data/user.yml. Open the file in any text-editor (e.g. Notepad or TextEdit) and look for user_name: Remilia Corporation. Change this to whatever name you want to appear on the left sidebar.
In the same /exocore/data/user.yml file, you will also see welcome_header and welcome_subtitle. These control the title and subtitle that appear on your homepage.
On the root folder you will find index.md, this can be edited like any other article as your homepage with the addition of the title and header from the user.yml file. Make sure you keep the following frontmatter at the top of the markdown file:
---
layout: home
title: home
---
The profile picture that appears on the left sidebar is located at assets/img/pfp.png, you can replace this file with any .png. Note that it will be resized into a square.
The social media card that appears when your site is linked on social media sites like Twitter, Facebook, etc. is located at assets/img/card.png, you can replace this file with any .png. Note that a dimension of 1200x630 is recommended.
Make sure the site’s url is changed in /_config.yml in the next step for this image to appear.
Navigate to /_config.yml to change the Title and URL of your exocore. All other settings can be left as is.
The Exocore ships with multiple themes to choose from. Navigate to /styles.scss and look for the line that says //Uncomment one of the following lines to choose a theme:. To select a theme, remove // from the line of the theme you want to try, and add // to the previously active theme (“yotsuba” by default).
You can add simple password protection by going to your Netlify account, entering your site, going to Settings > Build & Deploy > Build Settings > Edit Settings and changing Build commannd from the default bundle exec jekyll build to:
jekyll build && npx staticrypt _site/index.html P@SSW0RD -o _site/index.html
This will password protect the homepage with P@SSWORD as the password – you can change this to anything you’d like. Note that this will only protect the homepage, users will be able to directly link to any other page and have access to the whole site.
Move on to using your exocore for further guidance.
You can set up a personal website as a public exocortex with no code in this 15 minute guide, using entirely free services to host your site on the web.
All pages are converted from simple, non-code Markdown syntax, so you can focus purely on writing. The end result will look identical to this page.
Github will be used as a cloud content management system - it’s convenient to upload updates to, accessible and editable from anywhere, and keeps full version history of changes as well as provides easy options for back-up.
Netlify will be used to deploy the files stored on Github as a web-server - it’s fast and automatically updates whenever an update is made on your Github repository. Github does offer its own static webhost, but Netlify is necessary due to certain plugin support limitations.
Netlify will also provide your site a custom subdomain, e.g. [site-name].netlify.app. You can also use your own purchased domain.
All services are entirely free besides the custom domain.
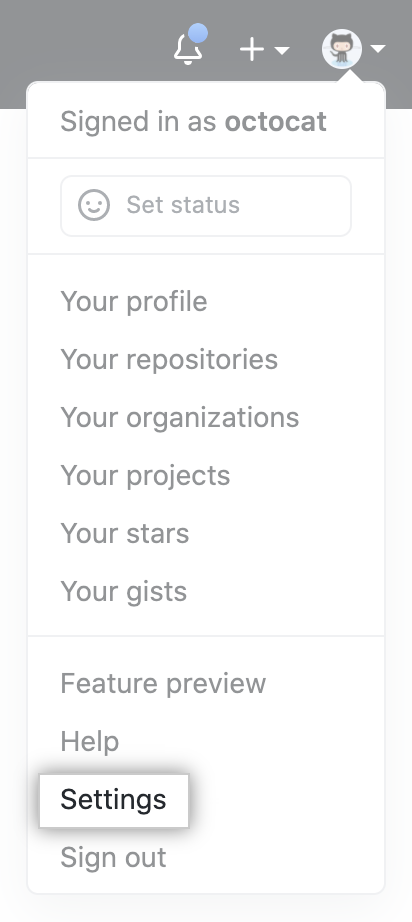
First, create an account on github.com if you do not already have one. Remember to make your email private in settings.
Continue below when you have an account ready.
Open our One-click installation.
Steps:
Connect to Github
Authorize Application
Deploy site
Netlify will now take about 5 minutes for the initial build of the site. If you want, you can watch the status of the build by clicking Production: master@HEAD under Production Deploys.
Once it’s complete, the Production status will change to Published, and you will be able to click the [site-name].netlify.app link to see your site.
The site’s master files will also appear in your Github account, under the repository name you selected, e.g. github.com/account-name/repository-name. Changes here will go live on the site automatically.
Your site is now officially live, available for anyone to view at [site-name].netlify.app., but there are some settings we should adjust before moving forward.
Change the default generated site name to whatever you’d like by navigating to Site settings > Site details > Change site name. It will be available at [sitename].netlify.app
Optionally, you can find instructions for setting up a custom domain [[here|custom domain]].
First, download Github Desktop if you don’t already have it.
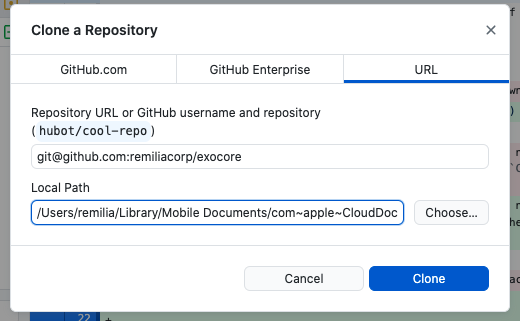
Open the program and follow the instructions to sign in to your Github account then click Current Repository at the top left, then Add > Clone Repository...
Now enter git@github.com:yourusername/reponame.git replacing your github username and repo name, e.g. git@github.com:remiliacorp/exocore.git, and where you want to store your exocore (if you want to edit on mobile this will need to be on a cloud drive like iCloud, see [Exocore Installation Instructions#Optional Setup Mobile Editing|7. Setup Mobile Editing])
If you’ve already cloned your repo before, you’ll need to make sure it’s set to ssh, not https. If you haven’t, continue onto Setup SSH with Github
Navigate to the repo on Github Desktop, then click Repository > Repository Settings in the menu bar.
If the Primary remote repository (origin) begins with git@github.com: you’re on ssh already and don’t need to do anything. If it begins with https://github.com/ simply replace that excerpt with git@github.com:.
eg https://github.com/remiliacorp/exocore.git becomes git@github.com:remiliacorp/exocore.git
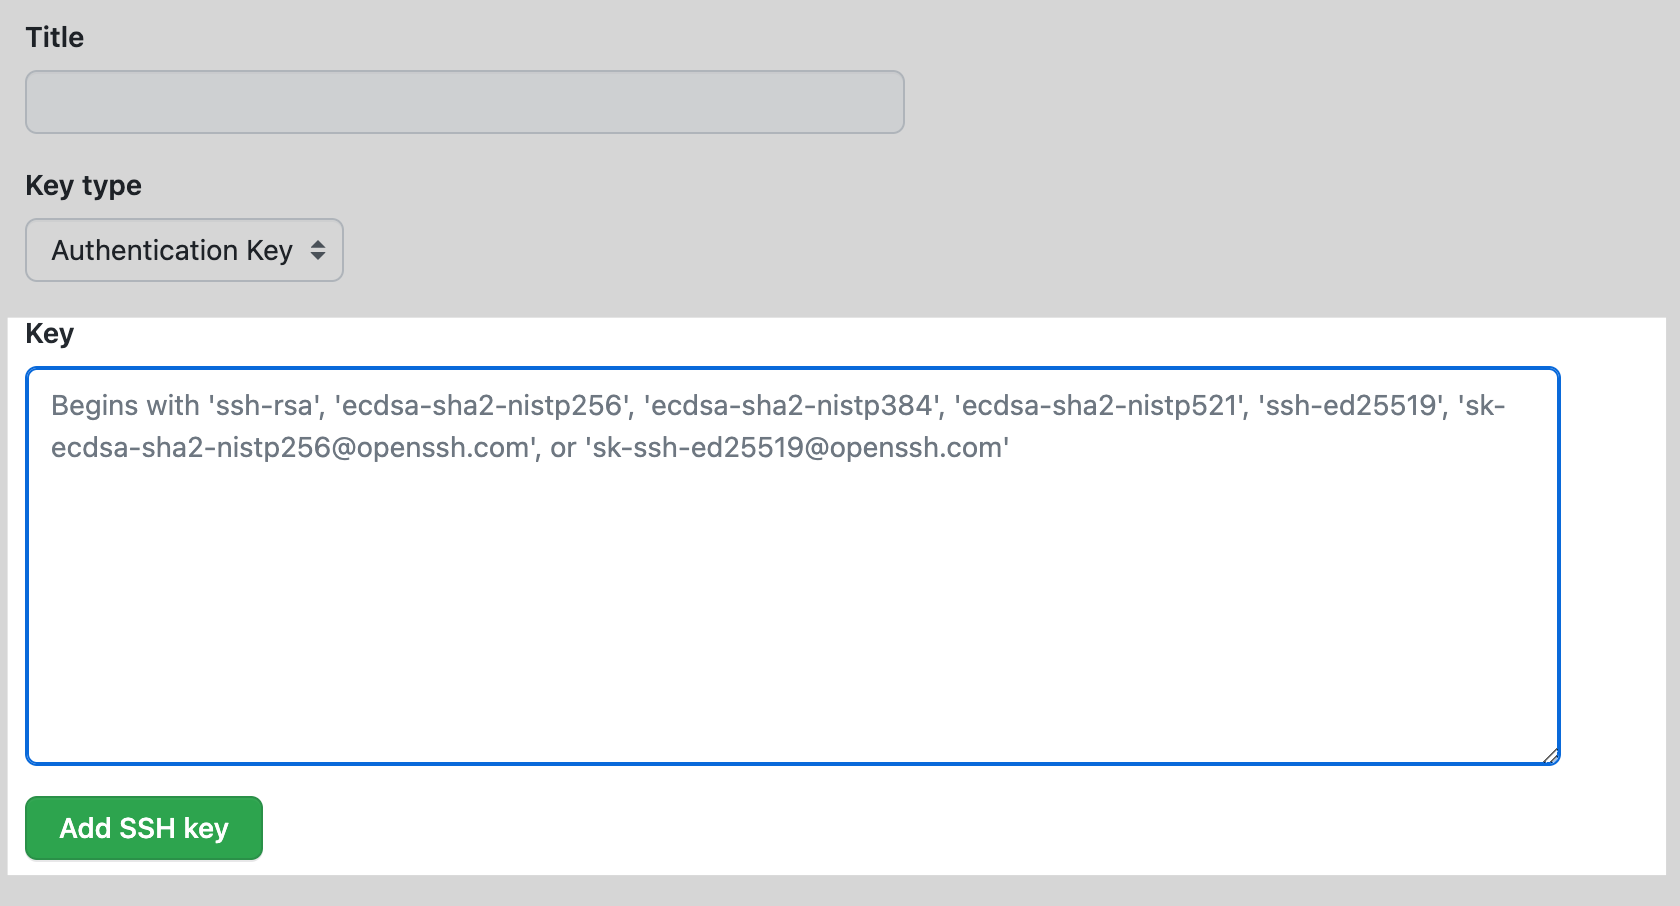
If you don’t already have an SSH Key, you’ll need to make one to add to Github. If you do move directly to [[Using Exocore on Obsidian#Add SSH Public Key to your Github|Add SSH Public Key to your Github]]. If you’re not sure, you can run ls -al ~/.ssh in Terminal to check, if you see id_rsa and id_rsa.pub you can continue to [[Using Exocore on Obsidian#Add SSH Public Key to your Github|Add SSH Public Key to your Github]].
Open Terminal on OSX or Linux (Git Bash on Windows).
Paste the text below, substituting in your GitHub email address:
ssh-keygen -t rsa -b 4096 -C "your_email@example.com"
This creates a new SSH key, using the provided email as a label.
> Generating public/private algorithm key pair.
When you’re prompted to “Enter a file in which to save the key,” press Enter. This accepts the default file location.
Enter a file in which to save the key (/Users/you/.ssh/id_rsa): [Press enter]
At the prompt, type a password that you’ll remember.
Enter passphrase (empty for no passphrase): [Type a passphrase]
Enter same passphrase again: [Type passphrase again]
$ eval "$(ssh-agent -s)"
You will see an output that looks something like:
Agent pid XXXXX
ssh-add ~/.ssh/id_rsa
OSX/Linux: pbcopy < ~/.ssh/id_rsa.pub
Windows (Git Bash): cat ~/.ssh/id_rsa.pub | clip

Download Obisidian on your PC.
Select Open a Folder as a Vault and select where you saved your exocore. Click Trust authors and enable plugins.
By default, changes are saved 10 minutes after no files have been edited to prevent publishing while you’re making corrections.
You can adjust this setting by clicking the gear icon in the bottom right, then scrolling down to the bottom of the sidebar and selecting Obsidian Git:
Vault backup interval (minutes) - how frequently you want to changes to be saved automatically. Set to 10 minutes by defaultAlso relevant if you plan to be editing on mobile is Auto pull interval (minutes), how frequently you want to sync with any changes to the exocore from another source. 10 minutes is reasonable, you can set this lower if you’re frequently moving back and forth from phone to PC. Make sure to set the Vault backup interval lower too if so.
Remember that you still control what is actually publicly published on the public site with the published: true/false tag at the top of each file.
/exocore/data/user.yml to change your username./_config.yml to change the Title and URL of your exocore.assets/img/pfp.png with a square profile picture of your choice.Each step explained in more detail with more personailzation options including changing themes at configure exocore for personal use.
Obsidian has a good mobile app if you want to do mobile editing, but you’ll either need to store your Exocore on a cloud service such as iCloud or Google Drive to get the files on your phone, or pay $10/mon for Obsidian Sync. The exocore is entirely text so it is very lightweight, the standard cloud drive 5-15GB free tiers all have more than enough to storage unless you’re hosting many PDFs or large files.
You’ll need to download their respective apps to point Obsidian to them on your local drive on both PC and mobile. For example, with Google Drive, you just download Drive for Desktop and Drive for Android and login and your files will be accessible on the Obsidian apps.
Warning: For iOS, you will need to use iCloud storage, Apple doesn’t support other cloud storage solutions. If you’re familiar with git workflows, you can also sync with Git using Working Copy or iSH as an alternative to iCloud.
Continue on to using your exocore to familiarize yourself with the editor interface and begin writing new notes.
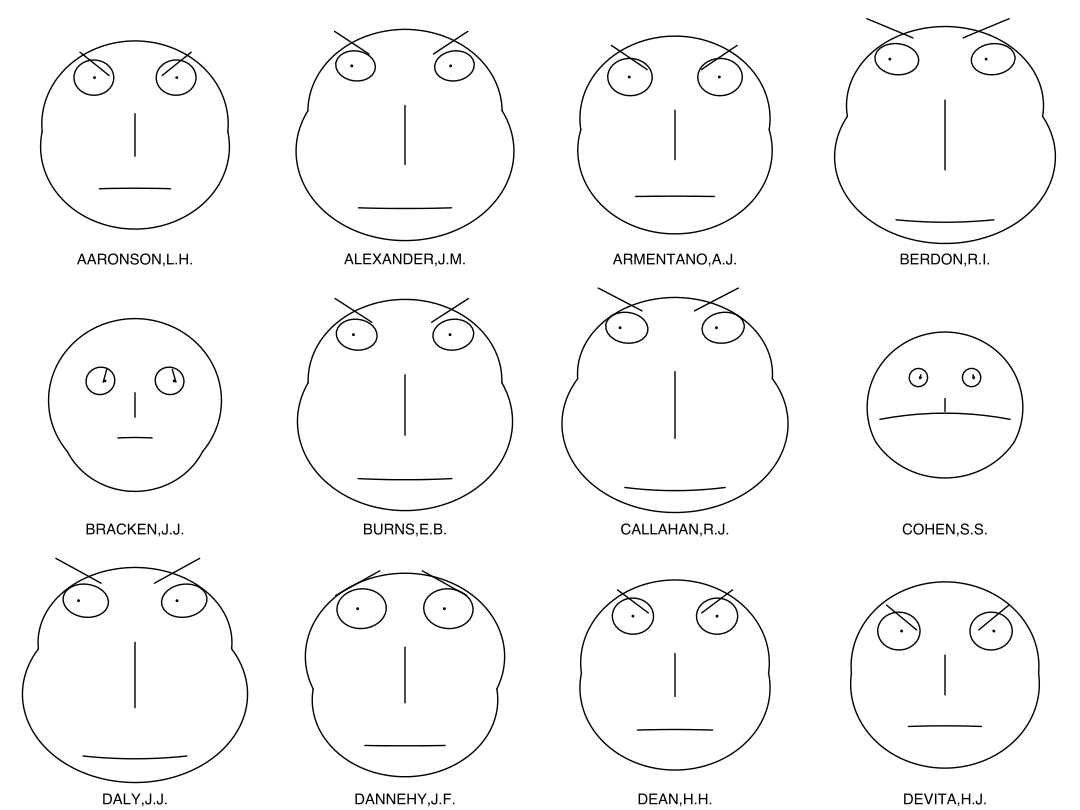
“Chernoff faces, invented by applied mathematician, statistician and physicist Herman Chernoff in 1973, display multivariate data in the shape of a human face. The individual parts, such as eyes, ears, mouth and nose represent values of the variables by their shape, size, placement and orientation.”

    Prefixes   Suffixes
    ---------- ----------
0.    doz        zod
1.    mar        nec
2.    bin        bud
3.    wan        wes
4.    sam        sev
5.    lit        per
6.    sig        sut
7.    hid        let
8.    fid        ful
9.    lis        pen
10.   sog        syt
11.   dir        dur
12.   wac        wep
13.   sab        ser
14.   wis        wyl
15.   sib        sun
Example:
  8 bits  galaxy  ~lyt
 16 bits  star    ~diglyt
 32 bits  planet  ~picder-ragsyt
 64 bits  moon    ~diglyt-diglyt-picder-ragsyt
128 bits  comet   ~racmus-mollen-fallyt-linpex--watres-sibbur-modlux-rinmex
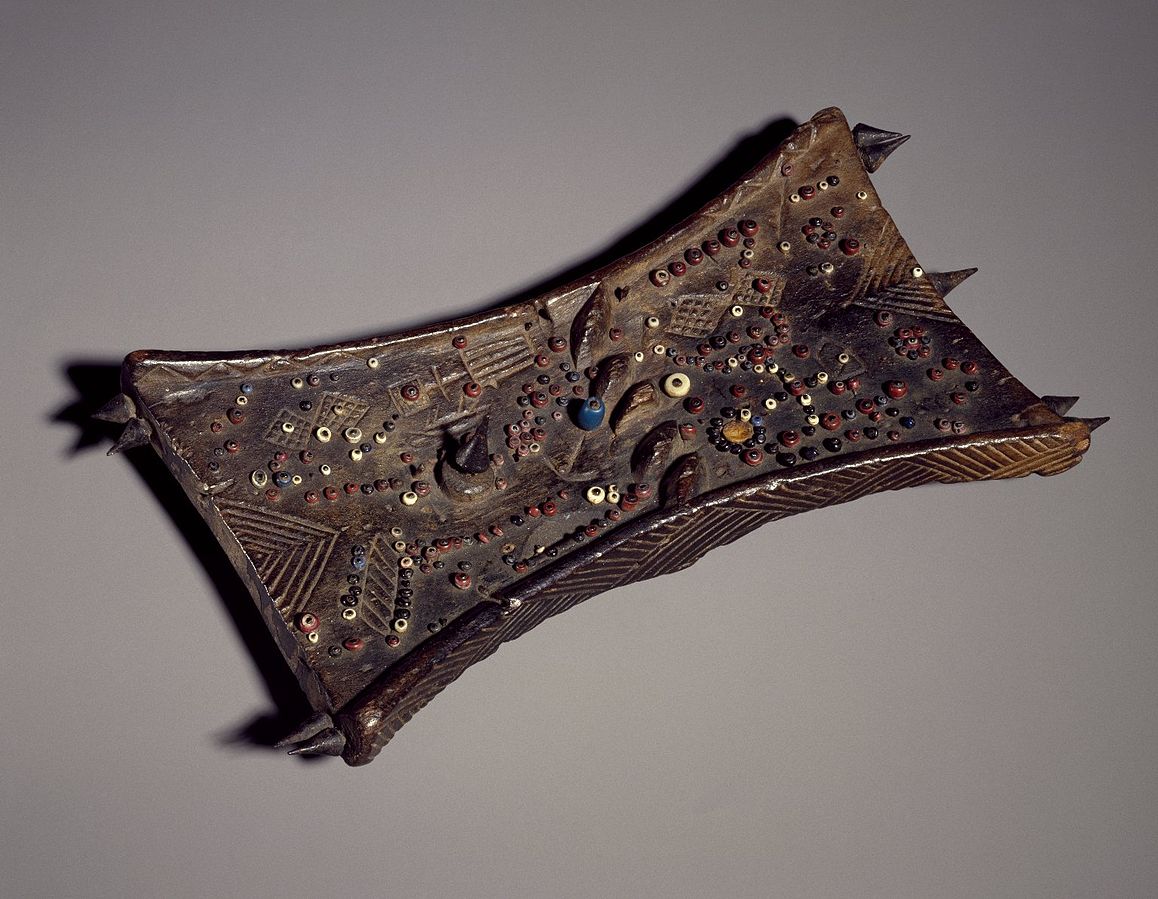
“Court historians known as bana balute (“men of memory”) run their fingertips across the surface of a lukasa or point to its features while reciting genealogies, king lists, maps of protocol, migration stories, and the great Luba Epic, a preeminent oral narrative that records how the culture heroes, Mbidi Kiluwe and his son Kalala Ilunga, introduced royal political practices and etiquette. “
Custom domains can be added for a better look and more memorable url, but you will need to purchase one. If you already have a domain, follow the steps in Configuring a Domain Purchased Elsewhere
If you do not already have a domain, you can purchase it directly within Netlify by adding in a new Custom domain. Prices aren’t the best on the market (e.g. .com is $15/yr, market rate is $12/yr), but it will automate all setup.
[domain] already has an owner. Is it you?. Select No, try another.Once you have a domain purchased, Netlify will automate handling DNS configuration and SSL encryption, so your site will be fully ready to go on your domain.
Domains can be purchased from a variety of suppliers for affordable rates - a .com domain goes for about $12/year, though uncommon domains like .xyz can be found for as low as $2/year.
I can recommend Google Domains, I use it because it includes privacy protection and custom email aliases for free, and has an easy to navigate dashboard, as well as Google’s very fast DNS.
For uncommon domains and more competitive prices, Namecheap is reliable - it also has a solid “Beast mode” search for finding rare domains.
If you purchase your domain elsewhere, you will need to configure your domain provider to point the domain to your Netlify site. Follow this guide: Configure external DNS for a custom domain.
The steps on your domain provider’s end will be different depending on your provider, look for something along the lines of “Create A or CNAME Record”, “Point DNS to Domain” or “Manage DNS Records”.
Then add the custom domain in Netlify:
[domain] already has an owner. Is it you?. Select No, try another.SSL (https) will be configured automatically.
Now that you’ve installed your exocore this guide will walk you through navigating it in practice. Read a more detailed explanation of the Exocore’s present and future functionality here.
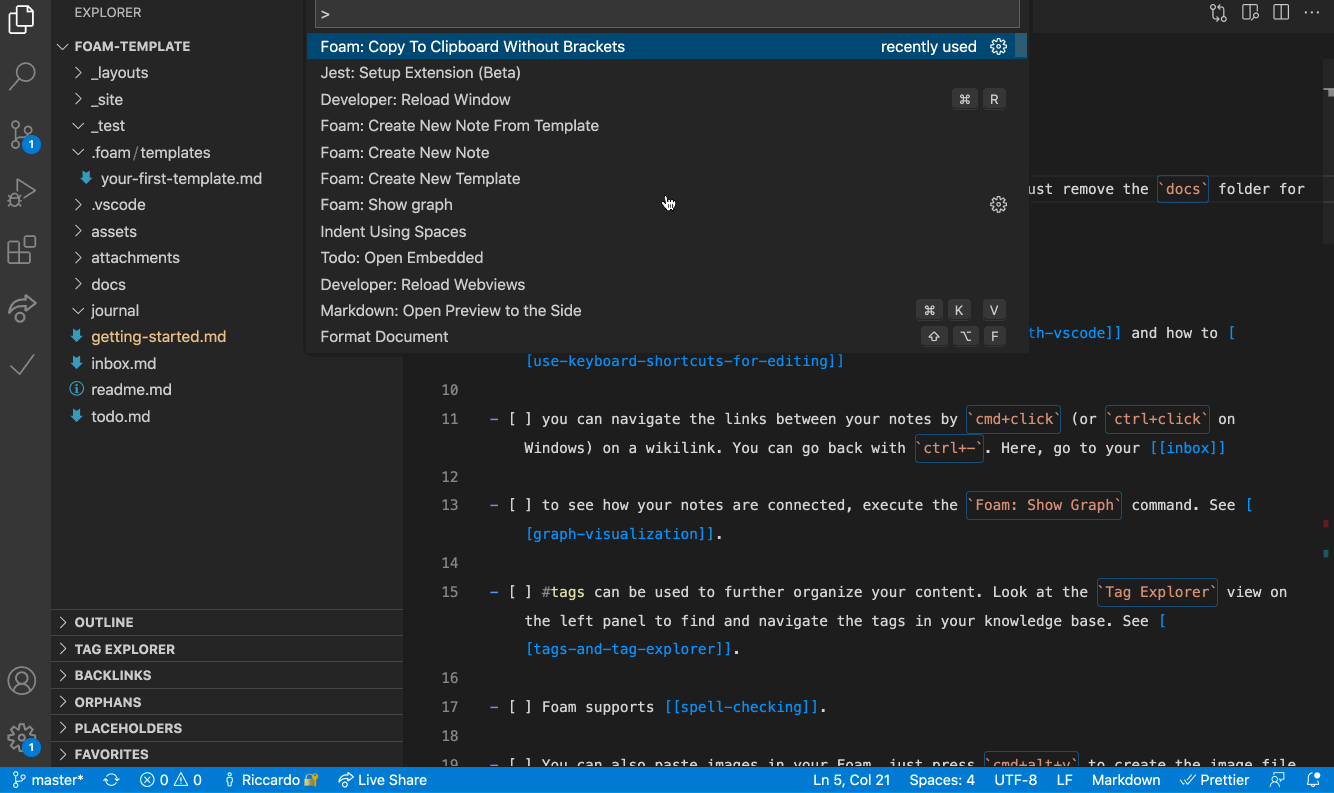
Open the root folder of your Exocore in VS Code to launch your editing interface.
Use keyboard command Ctrl + P (Cmd + P on OSX) to summon the command panel. From here you can access a variety of functions by beginning to type their names. Start typing ‘create new note from template’ to find the options for creating new posts.
You may have noticed that these notes together create a pipeline for systematising knowledge over time from the general to the particular, and for capturing a bank of scattered reference material and developing it into a polished final product. You might choose to cite a research dump in the subsequent post that it turned into as a bibliography/further reading section, such as appears at the bottom of this wiki note.
As you develop an idea, you may see it go through each stage of note until finally culminating in a well-researched article. Notes can even be embedded in full within other notes, explained in writing with exocore syntax
If you followed the above instructions to create a new post, you will notice that it spawned with a YAML metadata section at the top.
This metadata does not appear in the text of the post, but affects how the post will be treated when your Exocore is rendered into a website. The metadata of the post you are currently reading looks like this:
---
layout: article
category: article
subtitle:
topic: meta
date: 2022-04-13
tags: meta computers exocore
---
If you’re using a browser to read this, you won’t see this information at the top of the post, but the Exocore has incorporated it already into the way it treats the post. It has dated the post, sorted it into the ‘Articles’ section of the site, and given it tags which appear in the left sidebar. You can add to the topic and tags sections, backdate your post, or add a subtitle if you wish.
Your notes can be previewed in rendered markdown by clicking the glass icon on the top right of the window. You can navigate between linked notes from within this previewed window.
Obsidian: Ctrl+Click (OSX: CMD+Click) on a note can be used to create a new window split. Ctrl+W (OSX: CMD+W) can be used to close them. VSCODE: Ctrl+\ (OSX: Cmd+) can be used to create a new window split. Ctrl+W (OSX: CMD+W) can be used to close them.
See how your notes are connected via a graph by opening the command panel with ctrl+P (OSX: CMD+P) then entering Graph view: Open graph view(OBSIDIAN) / Foam: Show Graph (VSCODE). Notes can be clicked through to navigate your exocore this way.
Continue on to Writing with Exocore Syntax to learn the Markdown syntax standards it follows, as well as its extensions for hyperlinks, embedded code, footnotes and more.
The Exocore utilizes standardized Markdown syntax, along with some additional extensions. Much of the content of this article covers existing markdown syntax used universally in plain text formatting. However, some syntax, such as wikilinks and images are particular to the Exocore.
The above is a level 2 heading, preceded by ## and a space.
There’s nothing special about the way the Exocore processes headers— it’s just standard markdown. However, each header will render with an anchor link. If you hover over a heading and click the link icon that appears, the URL in your browser will reflect the section that you clicked. Now, if you copy that URL it will link directly to the heading that you clicked.
The above is a level 3 heading, preceded by ### and a space.
Here’s some advice: Only use top-level headings (preceded by #) for the document’s title. Aside from being markdown best practice, the Exocore takes your first top-level heading to use as the title of the page in the final rendered output. For intra-document section titles, use a level 2 heading. It’s for the best.
Here is a basic wikilink, pointing to other posts on this Exocore: <a class="wiki-link" href="/articles/exocore-executive-summary">exocore executive summary</a> It renders like this: exocore executive summary.
It is written as the title of their corresponding markdown file, surrounded by double square brackets. However, in the final render they are presented by default as the page’s title. This saves you typing out the whole page title in your markdown document, and allows the Foam VSCode extension to suggest files as you type. Below you can read about how to change their presentation.
You can alias a link like this: <span class="invalid-wiki-link">[[chinese-ginseng-chicken-tonic-soup|this link]]</span> if you don’t want to keep the title. Heads up— <span class="invalid-wiki-link">[[chinese-ginseng-chicken-tonic-soup|This link]]</span> points to a recipe for Chinese ginseng chicken Soup.
You can also point to headers within a page: <a class="wiki-link" href="/articles/writing-with-exocore-syntax#wikilink-embeds">This wikilink</a>. This wikilink points to a header further down on this page, by using a #. Under that header you will find a different sort of wikilink— an embed. The content of another note is embedded within the current note. You can also point to a particular header within another note.
Check out the backlinks section at the bottom of any post, and you’ll find a list of every post that links back to it. Backlinks are automatically generated, and display all posts with links pointing to them.
The below text is embedded, using the same wikilink syntax as normal, but with an ! prepended. The full text of the linked note will be included. For example, here is an example of embedded note syntax:
![jade-post]
Hyperlinks to external sites are not the same as wikilinks. A wikilink is a simple way to hyperlink to other posts on your Exocore without using the full processed URL as it is rendered online. A wikilink works locally in VSCode, allowing you to navigate between posts, and is transformed at render time to a web hyperlink, so that it always points to the correct page.
To create a hyperlink, use single normal parentheses around the URL you want to point to, and square brackets around the text you want displayed:
https://en.wikipedia.org/wiki/Parenthesis
[https://en.wikipedia.org/wiki/Parenthesis](https://en.wikipedia.org/wiki/Parenthesis)
You can alias a hyperlink by changing the text in the square brackets, like this:
Here’s some information about Hyperlinks.
[Here's some information about Hyperlinks.](https://en.wikipedia.org/wiki/Hyperlink)
Oh, by the way: You can apply the {:.right-aside} class to create an aside, like this one. An aside floats to one side and other text wraps around it. {:.left-aside} is also available for some variety.
Kramdown, the Markdown parser used by this implementation of the Exocore, has the ability to apply a CSS class to a paragraph by including syntax like {:.classname} at the top or bottom of a paragraph. The class will be applied to the whole paragraph. The Exocore stylesheet includes a few general classes meant to be used for just this purpose, which you should feel free to add to.
The following classes are pre-defined in the Exocore stylesheet:
{:.center} — Reduces width of paragraph and centers it for emphasis
{:.left-aside}, {:.right-aside} — Applies a border and floats to the left/right. Other text will wrap around it
{:.left}, {:.right} - Reduces width and places to the left/right (meant for images)
{:.border} - applies a thin border
{:.shadow} - applies a dark blurred drop shadow
{:.glow} - applies a bright blurred drop shadow (produces a glowing effect)
{:.flip} - flips the image (or text) horizontally
| You can           | create a          | simple table      | like this.     |
| ----------------- | ----------------- | ----------------- | -------------- |
| A new line        | in markdown       | extends the table | vertically.    |
| A pipe            | extends the table | laterally.        |                |
| You can | create a | simple table | like this. |
|---|---|---|---|
| A new line | in markdown | extends the table | vertically. |
| A pipe | extends the table | laterally. |
For more options, check out the ‘advanced tables’ plugin in the sidebar. This plugin will assist you with spacing and syntax, and includes a powerful formula function, about which you can find information here.
For more complex data representation, Graphviz can be used in conjunction with the Exocore. Read more about Graphviz syntax here, and find a demonstration of the way it is used with the Exocore [exocore-workflow|here].
Footnotes are done with [^1], and look like this: 1 Each footnote is an anchor link to the bottom of the page, with a return link attached. Notice the sidenote in the right margin, identical to the footnote.
All footnotes are also rendered as sidenotes. A footnote forms a commentary or citation best kept separate from the main text, and a sidenote is an easy way for a reader to access such commentary without breaking ergonomy by jumping up and down the page.
If you want to add multi-paragraph footnotes, indent your second paragraph, like this (see footnote at bottom).2
[^2]: For longer footnotes, you may want to use multiple paragraphs.

    Indent paragraphs to include them in the footnote.
You can put a footnote’s markdown reference immediately under a paragraph, like this3, or clump them at the end. Either way, they will appear at the bottom in your rendered content.
[^3]: This footnote appears immediately underneath its referring paragraph in this document's original markdown, but on the rendered website it shows at the bottom.
Footnotes automatically form a numbered list, and can also be mapped by name, like this: [^named-footnote]4
To insert an image, use the following syntax:

However, don’t bother remembering this syntax. the easiest way to insert an image is to use the Paste Image VSCode extension, included in Obsidian by default, which you will be prompted to download as a recommended third-party extension of the Foam VSCode extension. For MacOS, copy your image to the clipboard, and use keyboard command CMD + option + V. You will be prompted to give your image file a name, and add it to the images folder in your Exocore’s top-level directory. Note: If you CMD+C copy an image from your desktop on a mac, it is not copied to your clipboard. Instead, open the image, and then use the same keyboard command.
You can insert alt text and a caption like this:

*Insert a caption by placing italicised text immediately underneath the image*
The above snippet produces the below outcome:
 Insert a caption by placing italicised text immediately underneath the image, with no empty line in between.
To embed a piece of code so that characters are rendered verbatim, surround the code snippet with ``` on either side, like so:
#!/bin/zsh
cd ~/desktop/james-liao && bundle exec jekyll serve --baseurl ''
Use just one ` to embed code in the same line as the rest of your text.
Don’t use whitespace in your filenames— instead, name-them-like-this. This way, titles are easily converted to URLs and the back end of the Exocore remains happy. This of course applies only to filenames, and you may title your posts how you wish.
That should be everything to get you started!
This is the first footnote. Note the return button: ↲
For longer footnotes, you may want to use multiple paragraphs.
Indent paragraphs to include them in the footnote. ↲
This footnote appears immediately underneath its referring paragraph in this document’s original markdown, but on the rendered website it shows at the bottom. ↲
This footnote has the name ‘named-footnote’. it’s still numbered and appears in sequence the same way the others do, but naming it might help you manage a document with many footnotes when dealing with your local markdown. ↲
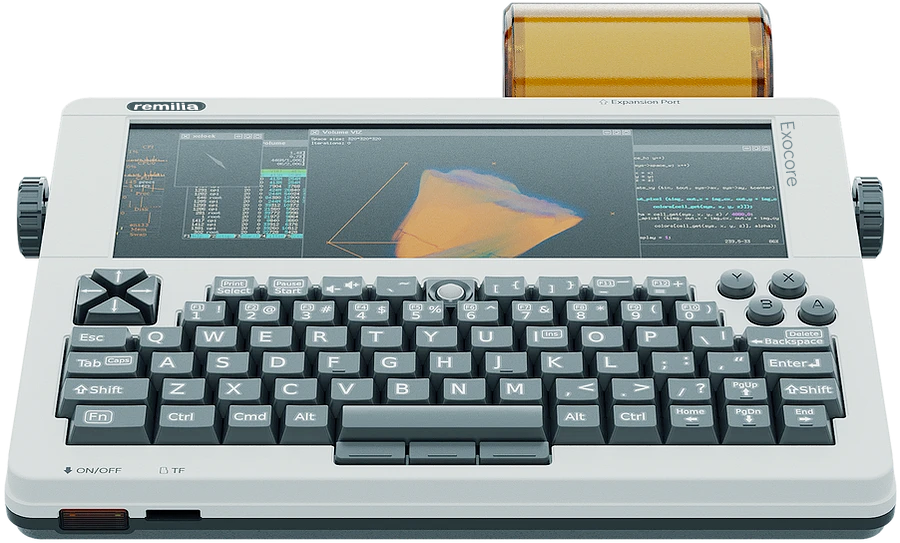
The exocore is a preconfigured package to roll out your own no-code, no-cost personal website as a public exocortex from documents written in simple Markdown syntax, including interlinking, generated backlinks and a nodal graph-rendering. Site’s are rendered in fast, responsive, standards-compliant static HTML.
The exocore is developed by Remilia Corporation as a Jamstack worfklow and extension of Foam to complete the system of an accessible and standardized autopublishing knowledgebase network, as a proof-of-concept for Remilia’s New Internet.
Follow the no code instructions to install your exocore and set up automatic publishing with Netlify. Time required: ~30 minutes.
Do you take notes, or conduct personal research? Do you output or collect text or image content in any form, such as a blog, poetry, diary or visual art? Do you intake any form of media, and want to catalogue your findings or thoughts? Do you forget information? The Exocore is a means to store and organize and publish such a bank of information in an easily navigable form.
The exocore comprises a set of a few programs and plugins, rolling them into a package which can be customized infinitely and modularly; without any technical knowledge it can still be made your own, and with even a touch of technical knowledge (particularly CSS or HTML facility) it can be made into anything at all.
Its online component is a scaffolding for a website, and its offline component (fully functional without the online) is a filing system for notes, written output, or other data. Out of the box, it’s a local directory of folders and interacting files forming an empty template for a zettelkasten/personal wiki, a platform for longform articles, a library of documents, a gallery of images, and an automatically created daily diary. Mix and match these features as you wish; they are fully modular and independent. A user would be free to use or not use any of these features, so if they want to create a self-hosted platform like Substack with no extra features, this is facilitated.
In the future, these exocores can comprise a webring linked by automatically updated network pages, as well as a IRC network for which the Exocore will operate as user’s personal homepages. They can also feature things like an automatically updated ‘latest posts’ feed from all other (or selected) Exocores, or just ‘related posts’ (by metadata tags) from your own site.

Notes are segregated into 4 categories:
These note categories together create a pipeline for systematising knowledge over time from the general to the particular, and for capturing a bank of scattered reference material and developing it into a polished final product. For example, you might choose to cite a research dump in the subsequent post that it turned into as a bibliography/further reading section. This workflow is designed to encourage active, daily use of the exocore for all thoughts.
The exocore is built as an extension on top of the Foam Visual Studio Code package, which is itself an open-source recreation of the Roam learning garden editor. Foam introduces the standard features required for a proper personal wiki system such as:
This system provides a powerful and highly customizable dashboard for comprehensive note-taking. On top of Foam, we’ve introduced:
A user download the package in the form of a Github repository template, which lives on their local machine as a directory that can be manually or automatically synced via git to a web domain, which represents the documents in the directory after they are processed into an eaily-navigable and feature-rich website. Their exocore can be published to the web at no-cost using Netlify’s free hosting and subdomain service.
A user can get by just fine only interacting with simple plaintext markdown files, and can write posts and create hyperlinks between them, add pictures or PDFs and more, without going beyond in-text markdown syntax (read more about the Exocore’s syntax here). They are also able to control how their generated website handles their documents in a human-readable metadata section at the top of each post: tags, title, subtitle, categories, layouts, date, and any others that the user cares to add.

Locally, the directory of notes (which will also be a git repository if you wish to publish as a website online) is managed and maintained through a VS Code workspace.
The recommended extensions for your workspace arrives as a package of two things:
A template directory including templates for simple creation of new markdown documents of different kinds (article, journal entry, wiki note, daily note), each treated differently in the rendering of your website.
A set of VSCode plugins which offer a suite of features for the user to add to their directory of posts by facilitating easy linking between notes, URL management, and many other features. The directory can be easily hosted for free with Netlify, for which a setup guide is available [Exocore Installation Instructions#1. Deploy your own Exocore to the Web|here].
To view your site before it is pushed online, a user can also set up their Exocore directory to build a local instance of the site with Jekyll. When publishing, Netlify runs Jekyll server-side, so running it locally produces the same site as will be published.
The stack is an open-source repo and a suite of open-source programs and plugins, and is therefore ultimately customizable. The level of customizability depends only on your technical know-how, but minimal learnings yield compounding rewards. Here is an idea of the level of control over your final website yielded by advancing levels of technical knowledge:
You can implement all of the above, and choose from a set of .CSS templates for your website to adjust its aesthetics. You can create posts, use the daily note functionality, store documents in the Library, create ZK notes and links between them, use backlinking, embed notes, and all other features mentioned above. In other words, all features are fully available with no technical knowledge. You should become acquainted with the Exocore’s writing with exocore syntax, but this is easy enough to guess at, or to learn in under half an hour.
For publishing, a very cursory knowledge of git will come in handy, but git has a helpful GUI, and Exocore documentation includes a guide on how to publish your site.
Obsidian Plugins:
VSCode Plugins: